


Rhubarb and Apple Lattice Tart
A new garden project.


Long story short. While developing some new recipes, I am republishing all of my previous recipes under the FoodStack Kitchen subsection. None of these were sent out to my subscribers, when I initially brought them over from a now closed publication, so hopefully, you will find them useful and interesting enough to make. Please let me know if you do.
I have just started a new garden project and will start growing more vegetables and fruit this coming season. With a bit of luck, I will document the process.
Before and After
I hired someone to tidy up this overgrown section of the garden. It takes years of neglect to curate a garden like this, :-) It had always been on my todo list, and this year was the year to do something about it.


Over the past few days I have been pottering about, filling plant pots to place at the very bottom raised section, making it more of an area to sit and easier to reach without having to bend over. It’s the same for the raised Vegetable bed, although I need to add lots of compost and decent soil before I start to grow anything.
Yesterday, I repotted some rhubarb and will have to wait for any other Rhubarb to push through the soil around the garden. I am told that you cannot kill Rhubarb plants, so let’s see what happens.
Growing Season
A few years ago a friend gave me a large Rhubarb crown, I have no idea which variety it is. For a while, I grew it in a pot, but yesterday, I repotted it in the large black oval planter along with some other Rhubarb that I managed to save before the big tidy up.
Rhubarb Planting season - October - March
Harvest - March - July
Ideally, when planting Rhubarb for the first time, it’s best not to harvest any fruit in the first year, and very few stems in the second year. This allows the plant to get well established.
To pick rhubarb, grip the stalks at the base and gently twist and pull, taking care not to leave any broken stems behind at the base of the plant, as these will rot and could damage the plant.
As a child, we used to eat freshly picked Rhubard dipped in sugar! My teeth ache at the thought of doing that now.
Rhubarb Fields - Where are they?
There seemed to be a time when fields around where I live were full of rhubarb plants. During the season, tractor loads of Rhubarb crowns would pass our house. Even if you never saw them, you would know of their passing because of the muddy trail the tractors left behind in the road.
We live in a house that is around 100 years old. When we first moved in nearly 40 years ago, there was a large rhubarb plant and one large blackcurrant bush.
Today, I have several Rhubarb plants, the varieties of which are unknown, at least two blackcurrant and redcurrant bushes, Gooseberries, and strawberries. Oh, and a small Fig tree and two varieties of apple trees that I planted a couple of years ago.
Last year (2024) I had my very first crop of Figs. But it’s still early days for the Apple trees to produce anything.
As I wait for the full rhubarb season to take hold again this year, I thought I would reshare this recipe from a time when I had about 300g of frozen rhubarb chunks left over from the previous year. I lightly blanched them for a few minutes before bagging them up and placing them in the freezer.
With all the replanting and digging that has been done recently, I doubt I will have a decent crop this year. But I can hope.
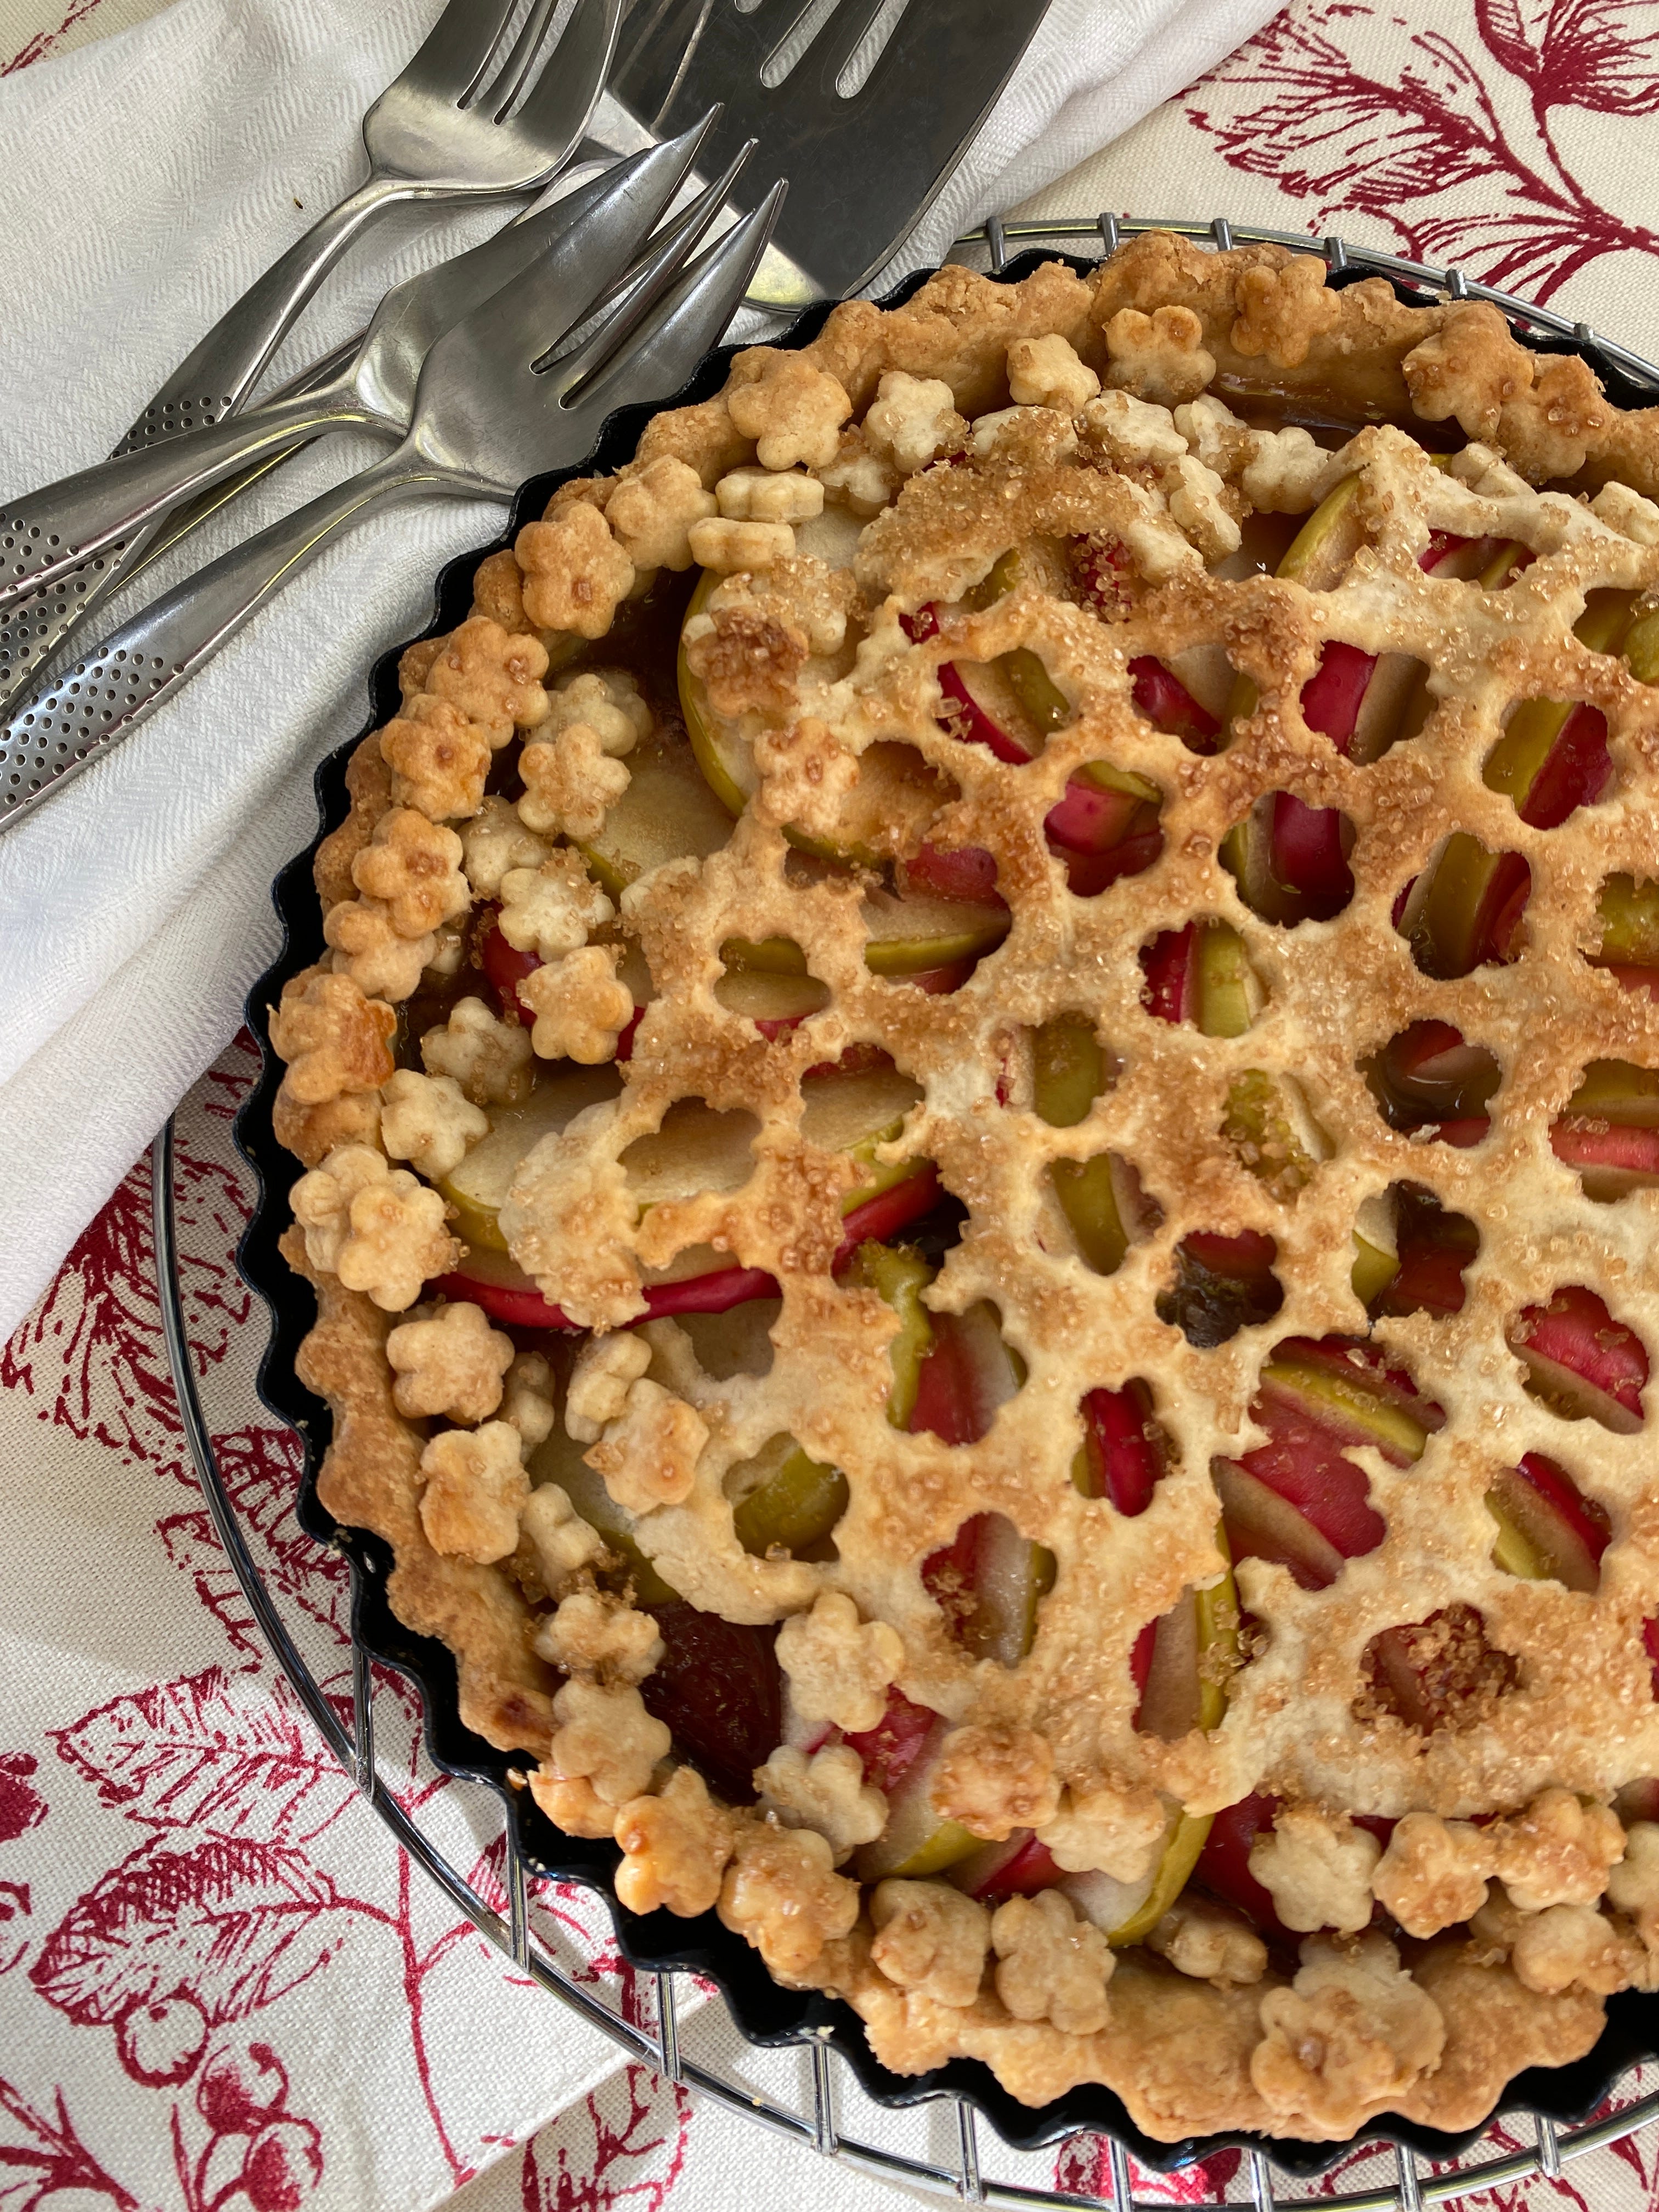
I stewed the frozen chunks and very thinly cored and sliced a few apples to make a Rhubarb and Apple Lattice Tart with a shortcrust pastry flavoured with ground ginger.
We served it with hot, Thick Homemade Custard, which really hit the spot on a cold, miserable, wet day.

Rhubarb and Apple Lattice Tart
I have flavoured this shortcrust pastry with a little ground ginger. The result is mild; feel free to add more ginger for a stronger flavour. You can add some ginger to the stewed Rhubarb but don’t overdo it.
You can prepare the filling first by stewing the Rhubarb and preparing the apples while the pastry rests in the fridge or baking blind in the oven.
For the Pastry
200g White Spelt plain flour ( or any plain white flour)
Pinch of salt ( only enough to hold between your thumb and finger)
1/2 teaspoon ground ginger. Feel free to add more to create a stronger flavoured pastry.
50g butter, fridge cold, cut into cubes
50g Trex, fridge cold, cut into cubes (vegetable baking fat)
1 medium egg
1 teaspoon cold water.
For the Filling
300g fresh or frozen Rhubarb cleaned and cut into chunks.
2 dessert apples
2 tablespoon Honey
1 teaspoon cornflour
1 Tablespoon Demerara Sugar for the topping
Method
Make the Filling
Step 1: Gently stew the Rhubarb with the honey until softened but not mushy.
Step 2: Remove the Rhubarb from the heat and drain it into a small dish, leaving the juice in the pan.
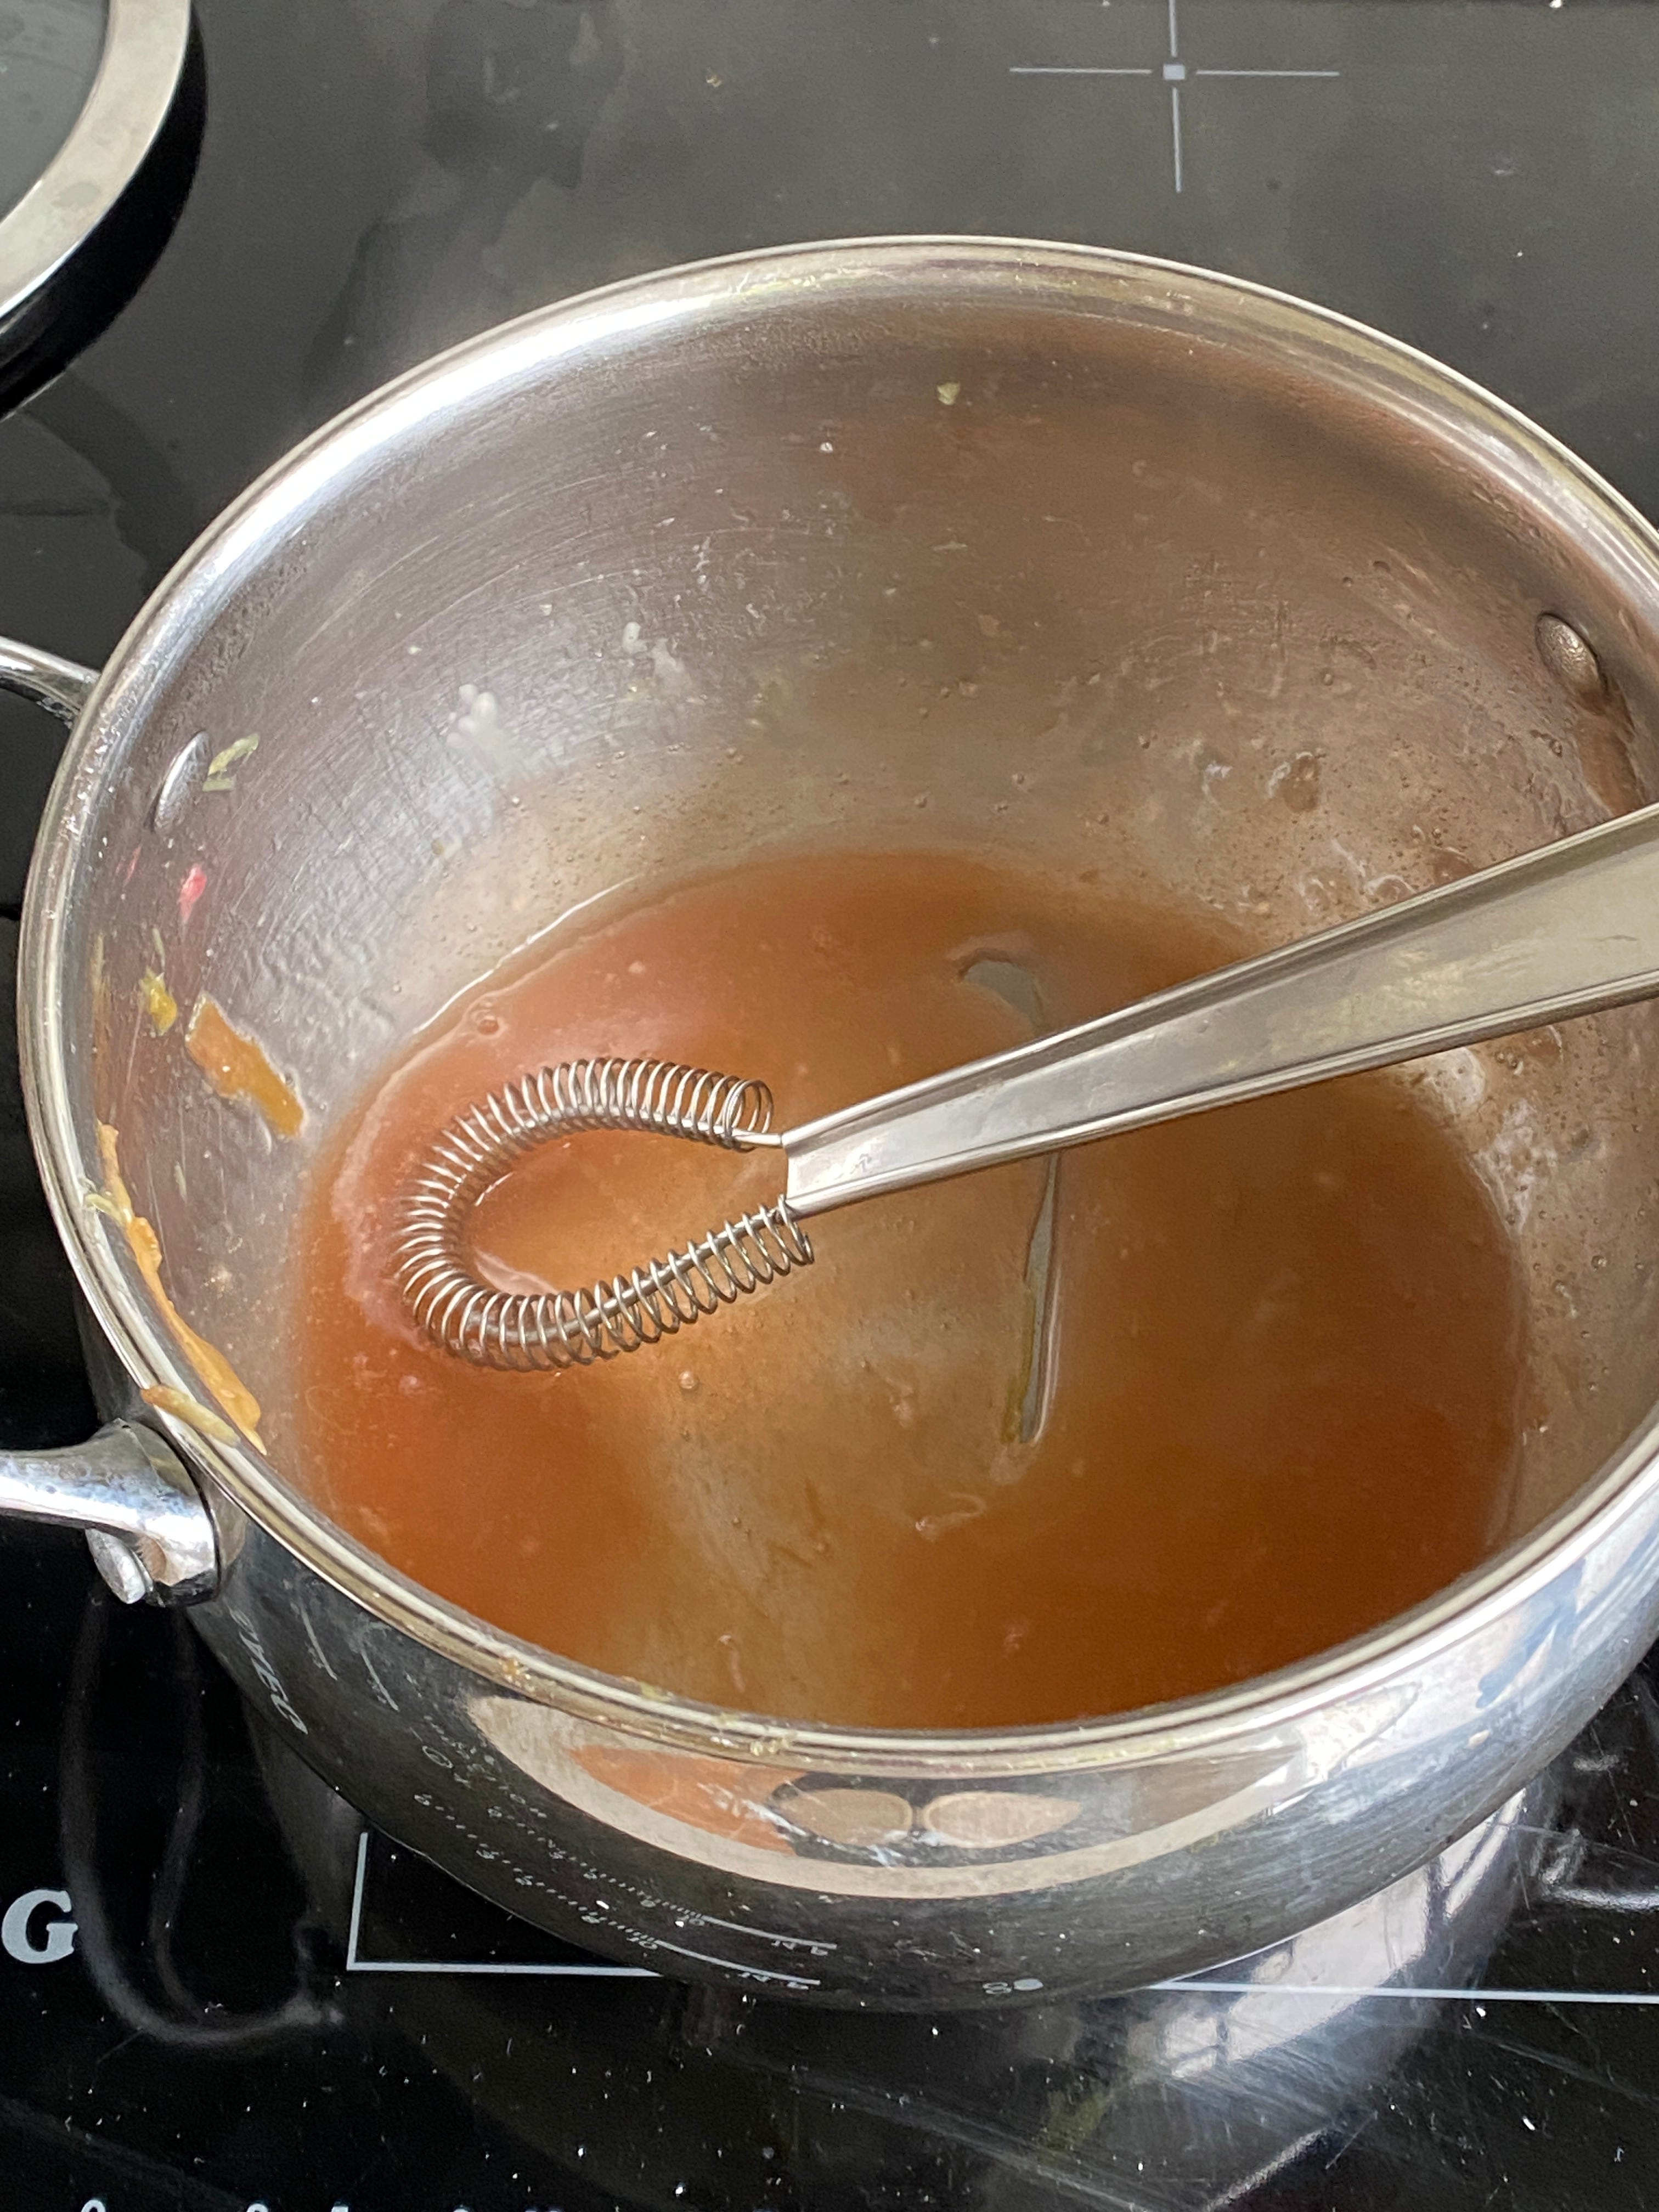
Step 3: Sprinkle the cornflour over the rhubarb juice left in the pan. Mix vigorously over a very low heat until the juice has thickened and there are no lumps.
Tip: You could make a paste with the cornflour by adding a little cold water before adding it to the Rhubarb juice. This will help reduce lumps.
Step 4: Take the pan off the heat, add the pieces of stewed Rhubarb back into the pan, and carefully fold them into the thickened juice until all the Rhubarb is covered. Leave to cool. Taste and add more honey if needed.

Step 5: Core the apples, leaving the peel on, and cut into very thin slices. Place the slices in a bowl of cold water to prevent them from going brown. Drain and then pat dry in a clean tea towel before adding them to the tart.
Make The Shortcrust Pastry
Tip: You can make the pastry ahead of time, including the blind baking.
Step 1: Place the flour, salt, ground ginger, butter, and Trex in a food processor and blitz until the mixture resembles fine breadcrumbs.
Step 2: Add the egg and the water and mix until you have a smooth, firm ball of dough.
Tip: Do not add all the water in one go. Only add enough to bring the dough together to a smooth dough.

Step 3: Flatten the dough a little and wrap it in cling film. Place in the fridge to rest for at least 30 minutes.
Step 4: Grease the base and sides of an 8-inch (fluted) tart tin with softened butter.
Step 5: Remove the pastry from the fridge and roll it out onto a lightly floured surface or between two sheets of nonstick baking parchment. The pastry should be rolled out large enough to cover the base and sides of the tin, with a little leftover for a decorative pastry top.
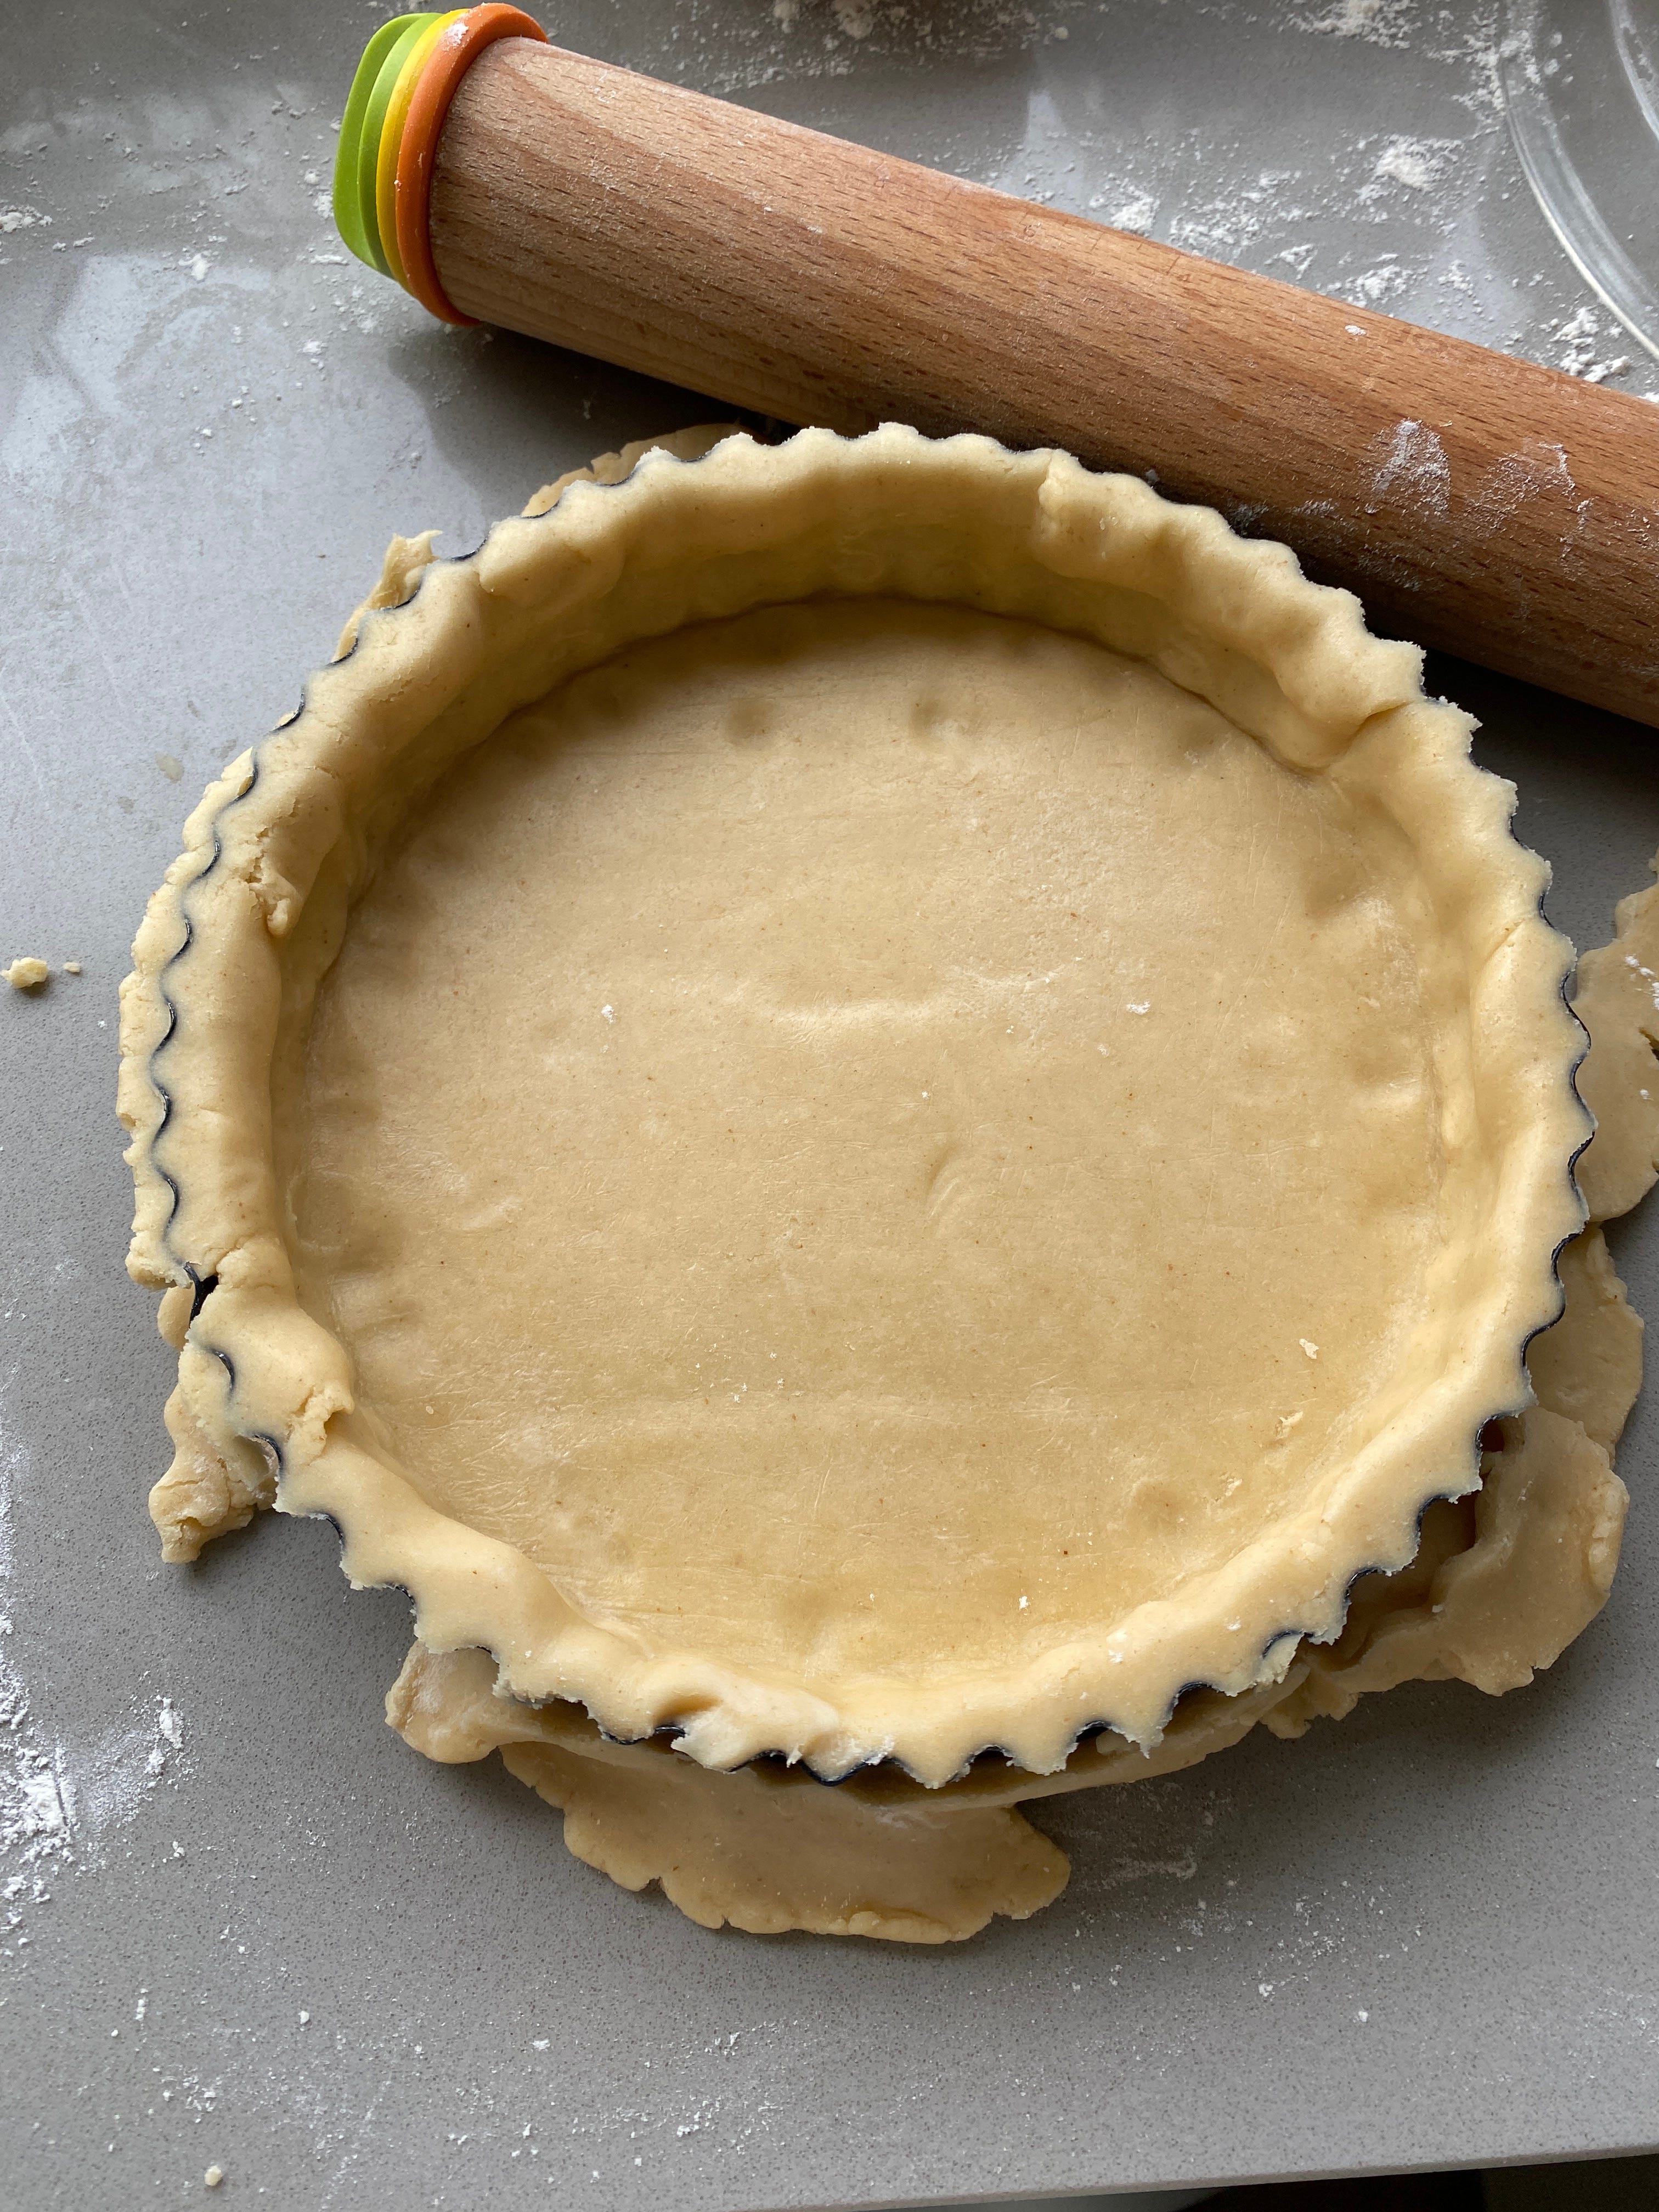
Step 6: Carefully line the prepared tin with the pastry, neatening the corners, and press the pastry firmly into the sides of the tin.
Pass a rolling pin over the top to remove surplus pastry easily. Prick the pastry base with a fork, cover it with baking parchment, and return it to the fridge to rest for 10 - 15 mins.
Tip: Leave the covered pastry in the fridge overnight if you want to bake the next day.
Tip: Any leftover pastry can be frozen to use another day. e.g. to make small tarts.
Preheat the oven to a 200 C deg fan-assisted oven.
Please note. All ovens are different and will bake at different temperatures. Invest in an oven thermometer to check it periodically.

Blind Baking
Step 7: Remove the pastry tart from the fridge and pour in some baking beans, ensuring they cover the base of the baking parchment.
Step 8: Place the pastry tart in the oven on the middle shelf and bake for 20 minutes. When baked, it should begin to feel dry to the touch. Remove the baking parchment and beans and return the tart to the oven for a few minutes to dry the pastry further. Remove from the oven and leave to cool a little.
Turn the oven down to 180C deg (fan-assisted oven)
Baking the Tart

Step 1: Take the baked pastry tart and carefully arrange the stewed Rhubarb over the bottom. Arrange the apple slices on top of the Rhubarb. Did you remember to drain the apples and pat them dry?
Step 2: Roll out the leftover pastry and cut it into decorative shapes. Place over the top of the apples.

Step 3: Brush the pastry with milk and scatter with demerara sugar. Bake in the oven at 180C deg for 30 - 35 minutes or until the apples have softened and the pastry is cooked on the top with a light golden brown colour.
Serve with fresh, thick, homemade custard using this recipe.
As always, Happy Baking and let me know how you get on.
Lynn x
This looks incredible! I'm so excited for rhubarb season.
A gorgeous looking tart! And sounds like you have a beautiful garden 😍